
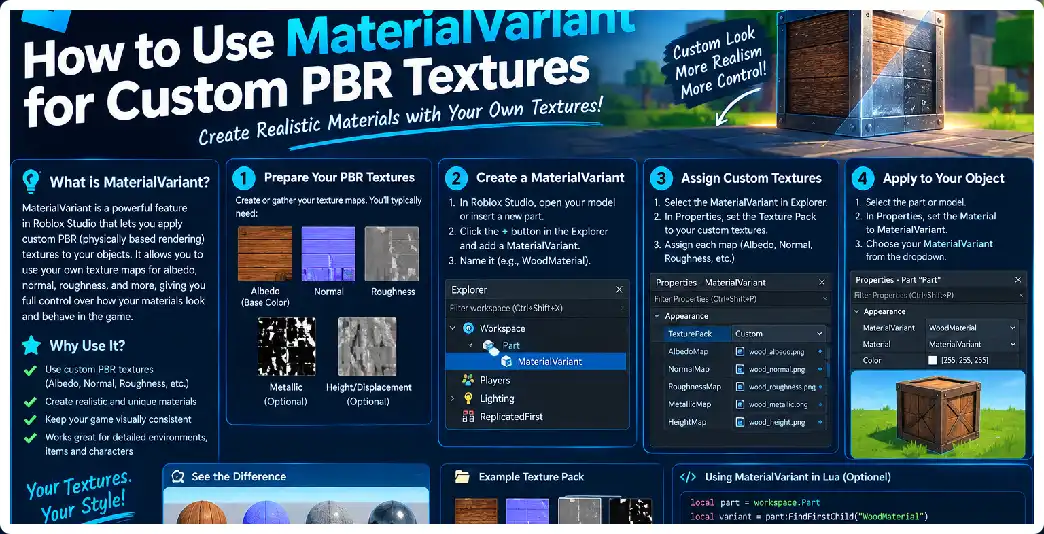
Creating realistic environments in Roblox Studio is no longer limited to the standard materials included with the platform. Developers can create reusable custom materials using MaterialVariant and combine them with physically based rendering, commonly called PBR, to produce surfaces such as realistic concrete, painted walls, wood, stone, metal, tiles, fabric, dirt, and many other materials. A MaterialVariant is particularly useful when the same material needs to be reused across many parts or terrain surfaces because it is designed around reusable, tileable material workflows rather than the UV-specific workflow of a single mesh.
A MaterialVariant can use several texture maps to control different aspects of a surface. These include a color map, normal map, roughness map, metalness map, and emissive information. Together, these maps allow lighting to interact with a surface in a much more detailed way than a simple color or basic texture can provide. The result can be a surface that visually responds to light as rough, polished, metallic, painted, worn, or uneven without requiring the underlying geometry to contain every tiny detail.
One of the most important concepts to understand before starting is that MaterialVariant is not simply another name for SurfaceAppearance. Both systems support PBR-style texture maps, but they are intended for different workflows. MaterialVariant is designed for reusable, tileable materials, while SurfaceAppearance is designed primarily for a particular MeshPart whose UV layout determines how the maps are placed on that mesh. Understanding this distinction will prevent many common texturing problems later.
This guide explains how to create a MaterialVariant from scratch, prepare your PBR maps, upload them, configure them in Roblox Studio, choose the appropriate base material, control tiling, apply the material to parts, troubleshoot common problems, optimize texture resolution, and create reusable material libraries suitable for large environments. The workflow applies equally to developers creating experiences for players in the United States, United Kingdom, Canada, and other supported regions because the underlying Studio material system is not region-specific.
What Is a MaterialVariant?
A MaterialVariant is a custom material configuration represented by a MaterialVariant instance inside MaterialService. It lets developers customize the visual appearance of an existing base material with their own PBR texture maps while retaining the physical characteristics associated with the chosen base material. This makes MaterialVariant particularly useful for environmental materials that need to be repeated throughout a map.
For example, imagine that your game contains hundreds of concrete wall pieces. Instead of putting a separate collection of texture objects on every piece, you can create one reusable concrete MaterialVariant and assign that material variant wherever the appropriate base material is used. This makes the environment easier to maintain because changes to the material can be managed centrally.
A useful mental model is:
Base Material
      +
PBR Texture Maps
      +
MaterialVariant
      ↓
Reusable Custom Material
The base material is important because a MaterialVariant can inherit physical properties from it. Those properties can influence things such as physical behavior, including characteristics related to density, friction, and other material interactions. Therefore, choosing a suitable base material is not purely a visual decision.
MaterialVariant Versus SurfaceAppearance
Before creating anything, decide whether your asset actually needs a MaterialVariant.
MaterialVariant is generally the better choice when you are creating a repeating environmental surface. Examples include brick walls, concrete floors, wooden planks, stone paths, tiled floors, dirt surfaces, and other materials that should repeat across many objects.
SurfaceAppearance is generally more appropriate when you have a specific MeshPart with a UV layout and want the PBR maps to follow that UV layout. This is particularly useful for props, custom meshes, weapons, vehicles, furniture, and other assets where the exact placement of the texture across the model matters.
The distinction can be summarized as follows:
| Requirement | Recommended approach |
|---|---|
| Repeating wall material | MaterialVariant |
| Repeating floor material | MaterialVariant |
| Reusable stone material | MaterialVariant |
| Custom prop with unique UVs | SurfaceAppearance |
| Weapon with unique texture layout | SurfaceAppearance |
| Furniture with baked texture placement | SurfaceAppearance |
| Large modular environment material | MaterialVariant |
This distinction is one of the most important decisions in a professional Roblox texturing workflow.
What Is PBR?
PBR stands for Physically Based Rendering. Instead of describing an object with only one color texture, PBR uses multiple maps to describe how different parts of the surface interact with light. This allows the same surface to behave more realistically as lighting conditions change.
A simple color texture might tell Roblox that a wall is gray. A PBR material can additionally tell the renderer that the wall is slightly rough, mostly non-metallic, contains small surface irregularities, and has areas that reflect light differently. The combination creates a much more convincing result without necessarily increasing geometric complexity.
Roblox currently supports several PBR map categories, including color, normal, roughness, metalness, and emissive maps. Not every material needs every map. A typical stone material may use color, normal, and roughness while leaving metalness empty because stone is not normally metallic.
Understanding the Color Map
The ColorMap is the visual color component of the material. It is sometimes referred to as the albedo map. It provides the underlying color information that the renderer uses when displaying the surface.
For a brick material, the ColorMap might contain red and brown bricks with darker mortar. For concrete, it might contain variations of gray. For wood, it could contain brown fibers and subtle color variation.
The ColorMap should generally represent the actual base color rather than attempting to fake highlights and shadows that should instead be produced by lighting and the other PBR maps. A material that contains strong baked lighting in its color map can look unnatural when the environment lighting changes.
Understanding the Normal Map
The NormalMap creates the visual impression of small surface detail. It can make a relatively flat mesh appear to have cracks, pores, grooves, scratches, brick edges, wood grain, or other small-scale surface features when lighting interacts with it.
A normal map does not actually change the geometry of the object. Instead, it changes how the surface responds visually to lighting. This makes normal maps particularly valuable for environmental materials because you can create the appearance of fine detail without adding thousands of polygons to a wall or floor.
Roblox expects tangent-space normal maps in the OpenGL format. A normal map that was authored for a different convention can produce inverted or incorrect lighting, which is one of the most common reasons a custom PBR surface looks strange after import.
A completely flat tangent-space normal map is represented by approximately [127, 127, 255]. If the surface appears dramatically raised, inverted, or strangely shaded, the normal-map format should be one of the first things you inspect.
Understanding Roughness
Roughness controls how widely light is scattered across the surface. A low roughness value produces a smoother, sharper reflection, while a high roughness value produces a more diffuse and matte response.
For example:
Low roughness
→ polished metal
→ glossy plastic
→ polished stone

Medium roughness
→ painted surface
→ leather
→ worn wood

High roughness
→ unfinished concrete
→ chalk
→ dry dirt
These are general visual examples rather than fixed values because real materials contain variation. A single object may have polished areas and rough areas, and the roughness map lets you represent those differences.
One common mistake is assuming that a dark roughness texture automatically means “dark material.” Roughness is not color. It controls the surface’s microsurface response to lighting. The ColorMap and RoughnessMap have completely different jobs.
Understanding Metalness
Metalness determines whether different parts of a material behave more like metallic or non-metallic surfaces. It should generally be used according to the physical nature of the material rather than simply adjusted until something looks shiny.
A steel surface may use a high metalness value, while concrete, wood, cloth, stone, and most painted surfaces are generally non-metallic. Metallic behavior should therefore be represented intentionally rather than used as a shortcut for creating gloss.
For a non-metal material, the metalness map will commonly remain black or close to black. For a metallic material, appropriate areas can contain higher values. The correct map depends on the material rather than on artistic preference alone.
Understanding Emissive Maps
An emissive mask identifies areas that should produce an illuminated appearance. It can be useful for signs, screens, glowing symbols, futuristic panels, magical surfaces, lights, and other materials that contain self-illuminated sections. MaterialVariant supports emissive-related properties including emissive mask content, strength, and tint.
Emissive should not be confused with ordinary bright color. A bright yellow ColorMap does not automatically behave like a glowing surface. An emissive map identifies areas where the material should receive emissive treatment.
Preparing Your PBR Texture Set
Before opening the Material Manager, prepare the texture maps. A basic material might contain:
Concrete_Color.png
Concrete_Normal.png
Concrete_Roughness.png
Concrete_Metalness.png
If the material does not need a metalness map, you can leave that map empty rather than creating unnecessary texture data. Official documentation specifically shows examples where a map such as metalness is left blank when it is not needed.
Roblox supports common image formats for uploaded textures, including PNG, JPG, TGA, and BMP. Texture resolution can go as high as 4096×4096 for supported textures, although using the highest possible resolution everywhere is not automatically the best choice for performance.
Texture Resolution
Texture resolution should match the physical scale and viewing distance of the material. Roblox provides general guidance for texture sizes, with smaller objects commonly benefiting from smaller maps and larger objects potentially requiring higher resolutions. The engine can stream lower-resolution versions as needed based on device resources, but reducing unnecessary source texture size can still help memory usage.
For example, a small decorative floor tile may not need a 4096×4096 map. A large environment surface viewed from close range may justify a larger texture budget.
A practical starting point could be:
Small material → 256×256
Medium material → 512×512
Large/detail-heavy material → 1024×1024
Very high-detail asset → consider higher resolution carefully
These should be treated as starting points rather than mandatory rules because actual requirements depend on the scale, camera distance, repetition, and target devices.
Creating the MaterialVariant
Open Roblox Studio and locate the Material Manager through the Studio interface. The Material Manager provides tools for creating and managing custom materials represented by MaterialVariant instances within MaterialService.
Create a new custom material and give it a descriptive name. A naming convention such as:
Concrete_Dark_MV
Brick_Red_MV
Wood_Oak_MV
Metal_Rusted_MV
Stone_Gray_MV
can make large projects easier to manage.
The Material Manager allows you to create a custom variant and select the base material that should provide its physical characteristics. Choosing the base material should be based on the physical nature of the surface rather than simply its color.
Choosing the Base Material
Suppose you are creating a concrete floor. A concrete-related base material is a sensible starting point because the physical behavior should resemble the intended surface. If you are creating wooden boards, select an appropriate wood-like base. If you are creating a metallic surface, choose a base material whose physical behavior makes sense for the intended object.
This separation between visual appearance and physical properties is extremely useful. You can create a custom visual appearance while still inheriting appropriate physical behavior from the selected base material.
Assigning the ColorMap
Once the MaterialVariant exists, assign your ColorMap to the appropriate property. The map provides the surface color and can also contain transparency information depending on the configured alpha behavior.
Check the material in the viewport immediately after applying the map. If the colors appear dramatically darker or lighter than expected, inspect the source texture, color workflow, lighting environment, and tint settings before changing other PBR maps.
Assigning the NormalMap
Next, assign the normal texture to NormalMap. Ensure that the source is a tangent-space OpenGL normal map. If you see strange lighting, inverted bumps, or deep-looking cavities that should be raised, the normal-map convention may be incorrect.
A good test is to use a simple material with obvious grooves or brick patterns. Rotate the camera and lighting around the object. Correct normal information should create believable changes in shading rather than appearing like a flat image pasted over the surface.
Assigning Roughness and Metalness
Add the RoughnessMap and MetalnessMap where appropriate. Remember that both are typically grayscale control maps rather than ordinary color textures. Roblox’s texture specifications identify roughness and metalness as single-channel grayscale map types.
If a concrete material looks like polished plastic, inspect the roughness map. If a wooden wall looks like chrome, inspect the metalness map. These two maps often explain why a technically correct PBR texture set produces an unrealistic result.
Controlling Material Tiling
One of the major advantages of MaterialVariant is its reusable tiling behavior. The StudsPerTile property controls how large the material’s texture pattern appears relative to the world surface. Material Manager workflows also expose Studs Per Tile controls for previewing how a material repeats across selected parts.
If the texture appears enormous, adjust the tiling scale so the repeated pattern represents a realistic physical size.
For example, a brick pattern should not appear as though one brick covers several meters unless that is intentional. Conversely, a tiny stone texture repeated thousands of times across a wall may look noisy and artificial.
Applying the Material to Parts
After creating the MaterialVariant, select a Part or appropriate object and choose the custom material variant through the material controls. Material variants can be applied per-part, and custom materials can also be used in terrain workflows.
If you have many modular objects using the same base material, the reusable nature of the MaterialVariant becomes especially useful. A building kit can use the same material definition across walls, floors, columns, and other pieces where appropriate.
Creating a Material Library
For a larger project, create a consistent library:
MaterialService
├── Concrete_Dark_MV
├── Concrete_Light_MV
├── Brick_Red_MV
├── Brick_Aged_MV
├── Wood_Oak_MV
├── Wood_Dark_MV
├── Metal_Steel_MV
├── Metal_Rusted_MV
├── Stone_Granite_MV
└── Stone_Sandstone_MV
This makes it much easier for environment artists to reuse approved materials rather than importing slightly different textures for every building.
Reusable custom materials are also useful when models or packages are reused. A MaterialVariant with the expected name can allow the appearance of reusable content to be adapted without individually editing every part.
Troubleshooting: Material Looks Too Shiny
If your surface looks too shiny, start with roughness and metalness. A low roughness value produces sharper reflections, while high roughness produces a more diffuse appearance. An incorrect metalness map can also make a non-metal material appear unnaturally reflective.
Do not simply increase roughness until the object looks good under one lighting setup. The material should be tested under different lighting conditions because physically based materials are intended to behave consistently across changing environments.
Troubleshooting: Material Looks Flat
If the color is correct but the material still looks flat, inspect the normal map and lighting. Normal maps provide visual surface depth through changes in lighting response. A missing or incorrectly authored normal map can make brick, stone, wood, and other detailed materials appear almost completely flat.
Also remember that normal maps do not physically alter geometry. If you need a silhouette to contain actual raised bricks or deep physical geometry, a texture alone cannot provide that geometric change.
Troubleshooting: Normal Map Looks Inverted
An inverted-looking normal map often indicates that the texture was created using an incompatible normal-map convention. Roblox currently supports OpenGL tangent-space normal maps. Check the normal-generation settings in your texturing application and export the appropriate format.
Troubleshooting: Texture Repeats Too Much
If a material repeats too frequently, adjust StudsPerTile. MaterialVariant is designed around reusable tiled materials, so controlling the physical scale of the repetition is an important part of creating believable surfaces.
If the pattern itself is visibly repetitive, improve the source texture rather than simply increasing its resolution. Larger maps do not automatically remove recognizable repetition.
Troubleshooting: Texture Looks Blurry
A blurry appearance can result from an unnecessarily small texture, inappropriate scaling, camera distance, filtering, or texture repetition. Roblox supports texture resolutions up to 4096×4096, but increasing every material to maximum resolution is not an efficient universal solution.
Choose texture resolution according to the material’s physical size and how closely players will view it.
Troubleshooting: Material Works on One Object but Not Another
Check whether you are using a MaterialVariant or SurfaceAppearance workflow. MaterialVariant is intended for reusable tiled materials, while SurfaceAppearance relies on the mesh’s UV mapping. A workflow designed for one system may not translate directly to the other.
Performance Considerations
PBR textures can significantly improve visual quality, but every texture has a memory and rendering cost. Roblox automatically handles texture quality according to device resources, but developers should still avoid unnecessarily large texture assets.
A strong environment does not need every surface to use maximum-resolution PBR maps. Reserve high-detail materials for surfaces players will actually see closely and use more efficient textures for distant or secondary surfaces.
Final Workflow
A reliable MaterialVariant workflow can be summarized as:
1. Decide whether MaterialVariant is appropriate.
2. Create tileable PBR textures.
3. Prepare ColorMap.
4. Prepare NormalMap.
5. Prepare RoughnessMap.
6. Prepare MetalnessMap if required.
7. Prepare EmissiveMap if required.
8. Upload the texture assets.
9. Open Material Manager.
10. Create MaterialVariant.
11. Choose an appropriate BaseMaterial.
12. Assign the texture maps.
13. Adjust StudsPerTile.
14. Apply the variant to parts.
15. Test under different lighting.
16. Test on multiple graphics levels.
17. Optimize texture resolution.
18. Add the material to your reusable library.
This workflow creates a foundation that can scale from a small Roblox Studio project to a large environment containing hundreds or thousands of modular pieces.
Frequently Asked Questions
Can MaterialVariant use PBR textures?
Yes. MaterialVariant supports PBR-related texture properties including color, metalness, normal, roughness, and emissive content.
Is MaterialVariant better than SurfaceAppearance?
Neither is universally better. MaterialVariant is intended for reusable tileable materials, while SurfaceAppearance is intended for PBR textures mapped according to a MeshPart’s UV layout.
Can MaterialVariant be used on normal Parts?
MaterialVariant is specifically useful for reusable materials because it does not depend on the custom UV mapping required by SurfaceAppearance workflows. SurfaceAppearance, by contrast, is designed for MeshParts with UV information.
Does a MaterialVariant change physical properties?
A MaterialVariant can inherit physical properties from its selected base material, which is one reason choosing the appropriate BaseMaterial matters.
What resolution should PBR textures use?
There is no single resolution that works for every asset. Texture size should reflect physical scale, viewing distance, detail requirements, and target-device constraints. Roblox supports texture resolutions up to 4096×4096, while its general guidance provides smaller resolutions for smaller objects.
Why does my normal map look wrong?
Check that the normal map is a tangent-space OpenGL normal map. Roblox does not use every normal-map convention interchangeably.
Do I need every PBR map?
No. Use only the maps necessary to describe the material. A non-metallic stone material, for example, may not need a meaningful metalness texture.
What does StudsPerTile do?
StudsPerTile controls the scale at which the material pattern repeats relative to the world surface. It is particularly important for maintaining realistic physical scale in tiled materials.
Can I reuse one MaterialVariant across many parts?
Yes. Reusable materials are one of the primary reasons to use MaterialVariant.
Can I use MaterialVariant for terrain?
Custom materials represented by MaterialVariant can be applied to parts and terrain through the material system.
Does PBR increase geometry?
No. PBR texture maps modify the visual response of the surface. Normal maps can create the appearance of small surface detail without actually changing the object’s geometry.
Conclusion
MaterialVariant provides Roblox developers with a powerful way to create reusable custom PBR materials without attaching an individually configured PBR object to every environmental asset. Its strongest use case is a library of tileable materials that can be applied consistently across modular environments.
The key to good results is not simply adding more texture maps. You need a correctly authored ColorMap, an appropriate tangent-space normal map, physically sensible roughness and metalness information, a suitable base material, and a realistic tiling scale.
Once these principles are understood, MaterialVariant becomes an efficient foundation for creating realistic floors, walls, roads, rocks, wood, metal, concrete, tiles, and many other reusable surfaces in Roblox Studio.