
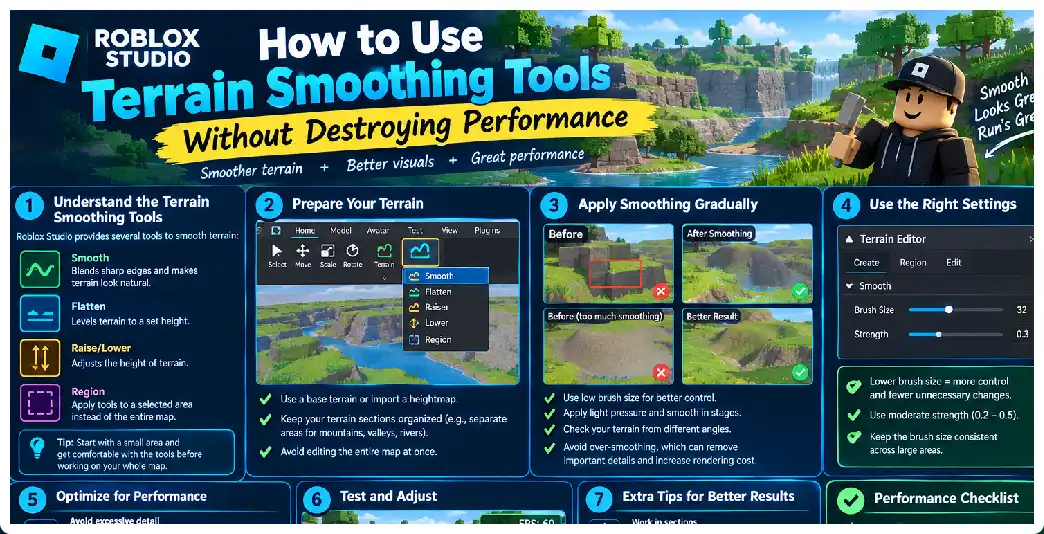
Creating natural-looking terrain is one of the most important parts of building an outdoor Roblox environment. Mountains, hills, cliffs, valleys, islands, roads, riverbanks, caves, and landscapes can make a game feel considerably more immersive. Roblox Studio’s Terrain Editor provides several tools for creating and modifying these environments, including Draw, Sculpt, Smooth, Flatten, Paint, Select, Transform, and other terrain-editing features.
However, there is a common misconception among newer developers that the Smooth tool itself is what makes terrain slow. In reality, the more important issue is how much terrain you create, how irregularly you edit it, how much unnecessary detail you introduce, and how large the resulting terrain representation becomes. Roblox terrain is based on a voxel system in which each terrain voxel represents a 4×4×4-stud region.
This distinction matters because you can create a beautiful landscape without turning every square area into unnecessarily complicated terrain. A carefully planned terrain surface can look detailed while remaining relatively simple underneath. Conversely, repeatedly sculpting and smoothing huge areas can create complicated terrain that offers little visible benefit to the player while increasing place size and potentially making the environment more difficult to manage.
The goal of this guide is therefore not to tell you to avoid Smooth. Instead, the goal is to show you how to use Smooth intelligently, where to use it, where not to use it, how to choose brush sizes and strengths, how to avoid excessive terrain detail, and how to test whether your terrain changes are actually affecting performance.
What the Smooth Tool Actually Does
The Smooth tool is designed to reduce abrupt edges and irregularities in terrain. It operates through a brush that modifies the existing terrain surface. Roblox provides several brush shapes, including sphere, box, and cylinder, together with brush size and strength controls.
Smooth can also be activated temporarily while using other terrain-editing tools. Holding Shift while working with Draw or Sculpt activates smoothing, which can make the editing workflow considerably faster when you are trying to shape natural terrain.
The important thing to understand is that smoothing does not magically create a new high-resolution mesh made from millions of polygons. Roblox terrain is represented using its voxel-based terrain system. The terrain system uses 4×4×4-stud voxels, and the editor modifies the terrain representation rather than turning every brush stroke into a conventional individual mesh object.
Therefore, the main performance question is not simply “How many times did I click Smooth?” Instead, ask: What terrain structure did those edits create, how large is it, and how much of it is actually necessary?
Why Excessive Terrain Detail Can Become a Problem
Large terrain environments can consume additional storage and resources, particularly when the terrain contains extensive irregular geometry and unnecessary detail. Official optimization guidance specifically states that reducing or simplifying terrain can significantly reduce place size and improve performance.
This becomes especially important when a developer creates a large map and then spends hours repeatedly smoothing every hill, cliff, valley, and underground section.
Imagine a 4,000-stud-wide outdoor map. You could create a relatively simple mountain range with broad slopes and a few carefully sculpted landmarks. Alternatively, you could repeatedly use small brushes across the entire landscape, creating thousands of tiny changes.
The second approach may look only marginally better from the player’s normal camera position, while producing substantially more detailed terrain data.
That is why terrain optimization should always be connected to what the player can actually see.
The 4×4×4 Voxel Principle
Roblox terrain uses a 4×4×4-stud voxel grid. This is one of the most important technical facts to understand when working with the Terrain Editor.
You are therefore not working with infinitely precise terrain geometry.
Instead, terrain occupies and modifies a structured volumetric representation. When you sculpt a mountain, smooth a cliff, or carve a valley, you are changing terrain occupancy and materials within that system.
This means that trying to create extremely tiny terrain features often provides diminishing returns.
A tiny bump that is only noticeable when your camera is extremely close may not justify extensive editing across a large area.
The Golden Rule: Large Forms First, Small Details Last
One of the best ways to protect performance is to build terrain in layers.
Start with:
- The overall landscape.
- Major mountains.
- Major valleys.
- Rivers and lakes.
- Playable areas.
- Roads and paths.
- Important cliffs.
- Small environmental details.
This workflow is consistent with Roblox’s own terrain-building guidance, which demonstrates generating or drawing a broad environment first and then using sculpting and other tools to refine it.
Do not begin by smoothing every small bump.
First determine whether the overall landscape works.
If the player spends most of the game in one valley, the valley deserves more attention than a mountain several kilometers away that is visible only as a silhouette.
Start With the Generate Tool When Appropriate
For very large landscapes, consider starting with procedural generation or a heightmap rather than manually sculpting every section.
The Terrain Editor’s Generate tool can create large terrain regions quickly and then allow you to fine-tune the result using the editing tools. It supports different biome types and settings for large-scale environments.
This gives you a useful workflow:
Generate → evaluate → simplify → sculpt important areas → smooth selectively → paint materials → optimize.
The important word is selectively.
Generation should provide the broad foundation. Smoothing should not become an excuse to manually refine every square stud.
Use Smooth for Transitions, Not Everything
The Smooth tool is particularly useful when two terrain shapes meet too abruptly.
For example:
- A mountain meets a valley.
- A road meets a hillside.
- A cliff transitions into a slope.
- A manually drawn hill has a visible artificial edge.
- A generated landscape contains an abrupt transition.
- A player path needs a more natural slope.
These are high-value smoothing targets.
Instead of smoothing an entire mountain, identify the sections where the terrain looks unnatural from the player’s normal viewpoint.
This approach reduces unnecessary editing while preserving the visual improvement that smoothing is intended to provide.
Brush Size Is a Performance-Friendly Artistic Control
The Terrain Editor provides brush sizes from 1 to 64, with additional height controls for certain brush shapes.
Large brushes are useful for broad terrain transitions.
For example, if a hill has a large unnatural bump, using a tiny brush and making hundreds of passes is usually less efficient than using an appropriately sized brush to correct the broad form.
A useful workflow is:
Large brush → broad correction → medium brush → refinement → small brush → only essential detail.
This also helps prevent the terrain from becoming covered in excessive micro-detail.
Do Not Use a Small Brush Everywhere
Small brushes are tempting because they provide a feeling of precision.
However, precision does not automatically equal quality.
If a player is running across a landscape at normal movement speed, tiny surface changes may be barely visible. Spending large amounts of editing time on them can create complexity without a meaningful visual payoff.
Small brushes are better reserved for areas where players can actually approach the terrain closely.
Examples include:
- Cave entrances.
- Mountain paths.
- Cliffs beside roads.
- Spawn areas.
- Important landmarks.
- Areas used for screenshots.
- Terrain immediately around buildings.
Strength Matters
The Smooth tool includes a strength control ranging from 0.1 to 1.
Using maximum strength for every pass can remove more terrain character than necessary.
Instead, consider using lower strength for finishing work.
A lower-strength brush lets you make gradual adjustments without dramatically changing the landscape in a single pass.
A useful workflow is:
High strength for major correction → medium strength for shaping → low strength for finishing.
This is particularly useful around gameplay-critical terrain where you want to preserve the intended elevation and shape.
Avoid Flattening and Smoothing the Same Area Repeatedly
One common workflow mistake is:
- Draw terrain.
- Smooth it.
- Flatten it.
- Smooth it again.
- Sculpt it.
- Smooth it again.
- Flatten it again.
Every additional operation can change the terrain shape in ways that require another correction.
Instead, establish the intended structure first.
For example, if you are building a road:
- Create the broad hill.
- Flatten the road corridor.
- Sculpt the surrounding terrain.
- Smooth the transition between road and terrain.
- Paint materials.
This is more controlled than constantly switching between conflicting operations.
Roblox’s Terrain Editor provides separate tools for Draw, Sculpt, Smooth, Flatten, and Paint because each tool serves a different purpose.
Understand Draw Versus Sculpt
The distinction between Draw and Sculpt is important.
The Draw tool can add or subtract terrain depending on its configuration, while Sculpt modifies existing terrain by growing or eroding it. Roblox’s terrain tutorial explicitly distinguishes the behavior of these tools.
This means that if you are trying to create a mountain from nothing, Draw may be appropriate for establishing the main volume.
If you already have a mountain and want to make it more natural, Sculpt can help shape it.
Smooth should generally come afterward to remove abrupt transitions.
A Better Mountain Workflow
Suppose you want to create a large mountain.
Do not start with Smooth.
Start with a large Draw brush and establish the basic volume.
Then use Sculpt to shape the mountain’s ridges and valleys.
After that, use Smooth on the sections that look too artificial.
Finally, use a small brush only around important areas.
This produces a hierarchy:
Primary shape → secondary shape → smoothing → detail.
The result is usually more natural and easier to optimize than trying to create the final mountain entirely through repeated smoothing.
Why Sloped Terrain Matters for Place Size
One of the most important optimization facts in Roblox terrain is that horizontal layers of the same material and occupancy compress better than sloped layers. Roblox specifically recommends limiting unnecessary subsurface detail and using horizontal layers where possible.
This does not mean that you should make your terrain flat.
Natural slopes are obviously necessary.
The point is that unnecessary internal terrain complexity is not free.
If a mountain has an enormous amount of detailed terrain underneath the visible surface, much of that information may provide no visual benefit.
Avoid Sculpting Underground Terrain You Never Use
This is one of the easiest optimizations.
Suppose you have a mountain that players cannot enter.
You may only need enough terrain volume to create the visible exterior.
You do not necessarily need a highly detailed internal structure throughout the entire mountain.
Similarly, if the bottom of a terrain island is permanently hidden below water, avoid spending time creating elaborate underground geometry that players cannot see or access.
Roblox’s place-size guidance explicitly recommends reducing unnecessary terrain and avoiding excessive terrain features.
Terrain Complexity Should Follow Gameplay
A performance-friendly environment should allocate detail based on gameplay.
Consider a racing game.
The racing track is extremely important.
The surrounding mountains may be distant background scenery.
The terrain immediately beside the track should therefore receive more attention than distant terrain.
For an exploration game, the opposite may be true.
Players may climb mountains and explore valleys, so those areas need more carefully controlled detail.
This is why there is no universal “maximum number of Smooth strokes.”
The correct amount depends on the environment’s scale, gameplay, camera distance, and platform targets.
Use the Select Tool for Large-Scale Operations
The Terrain Editor’s Select tool can select rectangular terrain regions, allowing you to work on larger areas systematically. It also supports size, position, and snapping controls.
This can be useful when managing a large map.
Instead of editing everything globally, divide the environment into logical regions.
For example:
Terrain
├── Spawn Region
├── Village
├── Forest
├── Mountain
├── River
├── Desert
└── Background
Then optimize each region according to its importance.
Keep the Background Simple
Background terrain is one of the best places to save complexity.
If a mountain is several hundred studs away and serves primarily as a visual silhouette, it does not necessarily need the same detail as terrain directly beside the player.
Broad shapes often work extremely well for distant scenery.
The player sees the silhouette, overall height, color, and major landmarks rather than every tiny indentation.
This principle can substantially reduce unnecessary editing.
Be Careful With Terrain Materials
Terrain materials affect both appearance and behavior. Roblox notes that terrain materials can affect visual characteristics and certain material-specific behaviors, such as animated grass on Grass and water behavior on Water.
Therefore, do not treat terrain material painting as purely decorative.
If you cover huge regions with materials that add additional visual effects, consider whether those effects are actually necessary.
For example, grass decoration can contribute to visual richness but may not be necessary across every square stud of a massive map.
Water Requires Planning
Water is another terrain feature that should be planned rather than added indiscriminately.
Large bodies of water can form a significant portion of a map.
Before adding extensive water terrain, determine its boundaries, depth, gameplay purpose, and whether players can actually access it.
Avoid creating unnecessary underwater terrain detail if the game never exposes it.
Vegetation Is Not Terrain
One important distinction is that terrain performance is only one component of overall performance.
You could optimize your terrain beautifully and still have a slow game because the environment contains excessive vegetation, meshes, textures, transparent objects, effects, or scripts.
Roblox’s optimization guidance emphasizes reducing unnecessary texture, geometry, and transparency and using performance profiling to identify actual bottlenecks.
Therefore, do not assume that every FPS problem is caused by Terrain Editor work.
Use Instance Streaming for Large Worlds
Large Roblox worlds can benefit substantially from instance streaming.
Instance streaming selectively loads and unloads 3D content according to player location, which can reduce client memory usage and improve load times. Roblox specifically recommends considering streaming for large worlds.
Streaming is especially relevant to large outdoor environments.
If your world is enormous, players generally do not need every distant object loaded at full detail at all times.
However, streaming should be tested carefully with gameplay systems, pathfinding, scripts, and objects that must remain available.
Streaming Does Not Mean You Can Ignore Terrain Optimization
Streaming is not an excuse to create unlimited terrain.
You should still simplify terrain.
Roblox’s performance guidance identifies memory usage, frame rate, and load time as separate concerns.
A large terrain environment can affect place size even if only portions of the world are streamed at a given moment.
Therefore:
Optimize terrain first, then use streaming to manage large worlds.
Measure Instead of Guessing
One of the biggest performance mistakes developers make is optimizing based on assumptions.
Roblox provides tools for identifying performance problems, including the Developer Console and MicroProfiler. These tools can help distinguish CPU, GPU, memory, and other performance problems.
If your game runs poorly after adding terrain, test before and after the terrain change.
If the frame rate does not meaningfully change, the terrain may not be the problem.
If memory increases substantially, investigate asset and terrain size.
If rendering time increases, examine the scene more broadly.
A Practical Terrain Optimization Test
Create a simple testing procedure.
Test 1
Run the game before terrain refinement.
Record:
- Frame rate.
- Memory usage.
- Join time.
- Device behavior.
Test 2
Apply your terrain smoothing changes.
Repeat the measurements.
Test 3
Temporarily remove or simplify the terrain.
Compare again.
This allows you to determine whether terrain is actually responsible for the problem.
The official performance workflow recommends identifying issues, improving them, and monitoring the result rather than making optimization decisions without measurement.
Watch for Terrain Compression Problems
Roblox documentation specifically notes that horizontal layers of identical material and occupancy compress better than sloped layers. It also recommends checking terrain wireframe rendering for messy holes or misplaced water that can increase compressed size.
This gives you a useful optimization technique.
Enable wireframe visualization and inspect the terrain.
Look for:
- Unnecessary holes.
- Strange internal cavities.
- Unused water.
- Extremely irregular underground areas.
- Terrain far below the playable surface.
- Accidental fragments.
Cleaning these areas can reduce unnecessary terrain data.
The Wireframe Check
The wireframe view is especially valuable after extensive sculpting.
A terrain surface can look perfectly normal from the player’s perspective while containing unnecessary complexity beneath it.
Check the terrain from multiple angles.
Look underneath islands.
Look below mountains.
Inspect caves.
Look around water.
Look under roads.
You may discover terrain that was accidentally created during earlier editing passes.
Avoid Huge Brush Strokes Across the Entire Map
A large brush is useful, but using it indiscriminately can cause unintended changes.
If you smooth an enormous region, you may flatten important ridges, alter valleys, and modify terrain that was already correct.
A better approach is to select specific areas and make deliberate passes.
Use large brushes for major corrections.
Use smaller brushes for localized fixes.
Do not repeatedly smooth the same region simply because it feels more polished.
Use Shift Smoothing During Sculpting
Holding Shift while using Draw or Sculpt can temporarily activate Smooth. This is useful for workflows where you want to create and immediately soften terrain transitions.
For example:
- Sculpt a ridge.
- Hold Shift.
- Smooth the ridge edge.
- Release Shift.
- Continue sculpting.
This can be much faster than switching tools repeatedly.
However, remember that convenience should not replace planning.
Create Terrain in Passes
A professional terrain workflow can use four passes.
Pass One: Blockout
Create major mountains, valleys, water, and playable regions.
Pass Two: Gameplay
Create roads, paths, ramps, cliffs, spawn locations, and navigation areas.
Pass Three: Visual Refinement
Smooth important transitions and improve silhouettes.
Pass Four: Optimization
Remove unnecessary terrain, simplify distant areas, inspect wireframe, test memory and performance, and verify streaming.
This is more efficient than attempting to create perfect terrain immediately.
How Much Smoothing Is Enough?
There is no universal number.
Instead, stop smoothing when:
- The terrain looks natural from normal gameplay distance.
- Player movement works correctly.
- Major silhouettes look good.
- Important locations are visually polished.
- Additional smoothing produces little visible improvement.
That last point is particularly important.
If another 20 minutes of smoothing only produces an improvement that is visible when the camera is extremely close, it may not be worth the additional complexity.
Terrain for Mobile Players
Performance should be considered across a broad range of devices.
Roblox identifies memory usage as particularly important because excessive memory usage can cause crashes and prevent users on lower-end devices from playing.
Therefore, if your audience includes mobile players, do not test only on a high-end desktop.
Use device emulation and real-device testing where possible.
Roblox Studio supports testing across different screen sizes and form factors.
Terrain for UK, USA, and Canada Audiences
The technical Terrain Editor workflow is not country-specific. Roblox Studio’s terrain system, voxel representation, editing tools, and performance principles apply to experiences regardless of whether your players are in the United Kingdom, United States, Canada, or elsewhere.
What changes is the range of devices and network conditions your audience may use.
Therefore, the most useful approach is to optimize for a broad device range rather than targeting a specific country.
A Performance-Friendly Smoothing Workflow
Here is a practical workflow you can use:
Step 1: Generate or block out the landscape.
Step 2: Identify the areas players will actually visit.
Step 3: Establish major elevations.
Step 4: Create roads and playable surfaces.
Step 5: Sculpt major natural forms.
Step 6: Use large Smooth brushes on obvious artificial transitions.
Step 7: Reduce brush size only where close-up detail matters.
Step 8: Use low-strength smoothing for final refinement.
Step 9: Remove unnecessary underground terrain.
Step 10: Inspect the terrain using wireframe visualization.
Step 11: Check for holes and misplaced water.
Step 12: Simplify distant terrain.
Step 13: Test memory and frame rate.
Step 14: Enable and test streaming if appropriate for the world.
Step 15: Test on lower-end devices.
This gives you a repeatable process rather than relying on trial and error.
FAQ
Does the Smooth tool itself destroy performance?
No. Smoothing is a standard Terrain Editor operation. The more important concern is the complexity and size of the terrain produced by extensive editing. Roblox specifically recommends simplifying terrain to reduce place size and improve performance.
What is Roblox terrain made from?
Roblox terrain uses a voxel system in which terrain voxels represent 4×4×4-stud regions.
What brush size should I use?
Use large brushes for large terrain shapes, medium brushes for transitions, and small brushes only for areas where close-up detail matters. The Terrain Editor supports brush sizes from 1 to 64.
Should I always use maximum Smooth strength?
No. Lower strength is useful for gradual refinement. The Smooth tool provides strength from 0.1 to 1.
Can I smooth an entire mountain?
You can, but you usually should not. Smooth the areas that actually need correction rather than repeatedly processing the entire mountain.
Does more detailed terrain always look better?
No. Detail that players cannot see or appreciate provides little artistic benefit while potentially increasing the amount of terrain data.
Should distant mountains be highly detailed?
Usually not. Broad silhouettes are often sufficient for distant terrain. Reserve detailed sculpting for locations that players approach.
Does underground terrain matter?
Yes. Unnecessary underground terrain can contribute to place size. Removing terrain that players never see or access can be an effective optimization.
Does terrain streaming solve performance problems?
Streaming can reduce client memory usage by selectively loading and unloading 3D content, especially in large worlds, but it does not replace good terrain optimization.
How can I determine whether terrain is actually causing lag?
Use performance diagnostics such as the Developer Console and MicroProfiler, and compare performance before and after terrain changes.
Should I optimize terrain before adding vegetation?
It is useful to establish a reasonably optimized terrain foundation first, but remember that vegetation, meshes, textures, transparency, lighting, and scripts can also affect performance.
Why does my terrain take up more space than expected?
Highly irregular terrain, unnecessary underground features, excessive slopes, holes, and misplaced water can contribute to larger terrain data. Horizontal layers of identical material and occupancy generally compress better than sloped layers.
Is smooth terrain better than parts for outdoor environments?
Roblox recommends using terrain for outdoor environments whenever possible because it is designed for landscapes such as mountains, valleys, hills, and bodies of water.
Final Takeaway
The secret to using Roblox terrain smoothing without destroying performance is not avoiding the Smooth tool.
It is using the tool with purpose.
Create the large landscape first. Sculpt major shapes second. Smooth only the transitions that need improvement. Reserve small brushes for close-up locations. Avoid excessive underground terrain. Keep distant landscapes simpler. Inspect the terrain for unnecessary holes and water. Test memory and frame rate rather than guessing. And use instance streaming when the scale of the world makes it appropriate.
The best Roblox terrain is not necessarily the terrain with the most edits.
It is the terrain that provides the right visual detail where players need it while keeping unnecessary complexity under control.