
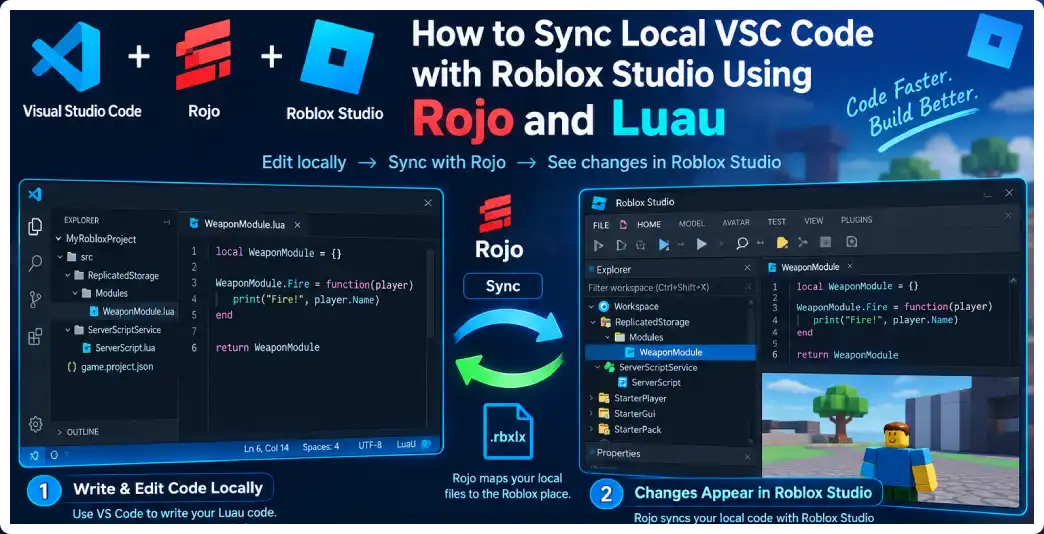
Developing a Roblox game entirely inside Roblox Studio can work well for small projects, but larger projects often benefit from moving Luau development into a dedicated code editor such as Visual Studio Code. A local development workflow makes it easier to organize scripts, search across a large codebase, use source control, format code, perform static analysis, and structure a project like a conventional software-development project. Rojo provides a file-system-first workflow in which files on your computer are mapped into Roblox instances and synchronized with Roblox Studio.
The important idea is that Rojo does not replace Roblox Studio. Instead, it creates a bridge between your local project and the Roblox DataModel. You write Luau files in VS Code, Rojo watches and serves the project, and the Rojo Studio plugin communicates with that local server so changes can appear inside Studio. This makes it possible to keep your source code on disk while still using Studio for testing, play mode, building, inspecting the Explorer hierarchy, and working with Roblox-specific features.
For modern Roblox development, this approach can also make source control much more practical. Instead of storing every script only inside a place file, your Luau source exists as normal files that can be organized into folders and tracked using a version-control system. Roblox’s own documentation distinguishes between its built-in Script Sync feature and third-party file-system-first workflows such as Rojo: Script Sync is useful when you primarily want external editing of scripts, while Rojo is designed for projects where the file system becomes the primary representation of the project.
This guide explains how the complete workflow works, how to install Rojo, how to configure VS Code, how to create a Rojo project, how .server.lua, .client.lua, and .lua files map to Roblox scripts, how to start live synchronization, how to structure a real project, how to use Luau type checking, how to handle models and assets, how to troubleshoot synchronization problems, and how to establish a workflow suitable for larger Roblox games.
What Is Rojo?
Rojo is a development tool that maps a local file-and-folder structure to Roblox instances. A Rojo project normally contains a .project.json file describing how directories and files should become Roblox services, folders, scripts, models, and other supported instances. The project file contains a project name and a tree describing the Roblox DataModel structure.
For example, your computer might contain:
MyGame/
├── default.project.json
└── src/
    ├── ReplicatedStorage/
    │   └── Shared/
    │       └── MathUtils.lua
    ├── ServerScriptService/
    │   └── Main.server.lua
    └── StarterPlayer/
        └── StarterPlayerScripts/
            └── Main.client.lua
Rojo interprets this structure and turns the files into Roblox instances according to its project rules. A .server.lua file represents a server script, a .client.lua file represents a client script, and a normal .lua file generally represents a ModuleScript. Directories become folders unless special initialization files or project rules change their representation.
This separation is useful because the location and type of a Roblox script matter. A server script should not accidentally become a LocalScript, and a shared module should not accidentally be placed somewhere inaccessible to the code that needs it. By representing the hierarchy explicitly on disk, your development environment can mirror the Roblox architecture more clearly.
Why Use VS Code Instead of Only Roblox Studio?
Roblox Studio includes a capable script editor with autocomplete, syntax support, navigation, type checking, and other development features. For many projects, Studio’s editor is sufficient. However, developers working on larger codebases may want the additional file-management and development capabilities of an external editor.
VS Code can make it easier to work with dozens or hundreds of files because the entire project can be treated as a normal directory. You can search across files, create folders, rename modules, inspect project configuration, integrate source control, and use extensions for Luau development.
Another major advantage is that your source code becomes independent of a single Studio session. You can close Studio, continue reviewing or modifying code, commit changes to source control, create branches, compare versions, and work with a conventional development workflow.
Luau’s gradual type system is another important part of this workflow. Type annotations and inference can help detect mistakes while code is being written instead of waiting until the game runs. Strict type checking can be enabled with --!strict, while other modes provide different levels of checking.
Rojo Versus Built-In Script Sync
Roblox Studio now includes Script Sync, which can synchronize supported scripts between Studio and local files. This is useful if you want to retain Studio as the main project environment while editing scripts externally.
Rojo is different because it is designed around a file-system-first project model. If you want your project hierarchy and source files to be represented locally and managed as a development project, Rojo is designed for that workflow. Roblox’s documentation specifically describes Rojo as a stronger fit when the file system is intended to be the source of truth for the project rather than merely an external editor for selected scripts.
Therefore, the choice is largely architectural:
- Use Studio Script Sync when Studio remains the primary project environment.
- Use Rojo when your local project files are the primary development representation.
- Use VS Code when you want a dedicated development environment.
- Use Luau tooling when you want stronger code analysis and development assistance.
For a serious code-heavy Roblox project, the Rojo approach can provide a much more conventional software-development workflow.
Step 1: Install Visual Studio Code
Install Visual Studio Code on your development computer and make sure you can create and open folders normally.
After installation, create a dedicated directory for your Roblox project.
For example:
Documents/
└── RobloxProjects/
    └── SpaceAdventure/
Open the SpaceAdventure directory in VS Code.
Keeping each Roblox game in its own directory is important because Rojo project files, tool configuration, source code, assets, and dependency configuration should remain associated with the correct game.
Step 2: Install Rojo
Current Rojo documentation provides multiple installation approaches, including installation through a toolchain manager and other supported methods. The recommended modern toolchain approach uses a project-level tool configuration so teams can keep their Rojo versions consistent.
A project-level toolchain is particularly valuable when multiple developers work on the same game.
For example, a project can specify its Rojo version rather than requiring every developer to independently install whatever version happens to be current on their computer.
This reduces a common development problem:
Developer A → Rojo version X
Developer B → Rojo version Y
Developer C → Rojo version Z
A controlled toolchain instead aims for:
Project
   ↓
Pinned Rojo version
   ↓
Same project behavior for everyone
The exact installation commands can change as tooling evolves, so developers should follow the current installation instructions for their operating system rather than copying an outdated command from an old tutorial.
Step 3: Install the Rojo VS Code Extension
Rojo provides a VS Code extension that can integrate Rojo commands into the editor. The extension can provide a convenient interface for starting and stopping the Rojo server and working with synchronization.
However, an important distinction is that the VS Code extension itself does not necessarily mean the Rojo command-line executable is available in your system PATH. If you want to run commands such as rojo serve directly in a terminal, the CLI needs to be installed appropriately.
This distinction explains why some beginners install an extension and then receive an error when typing rojo into a terminal.
Step 4: Install the Rojo Studio Plugin
Rojo requires a Roblox Studio plugin for live synchronization. The local Rojo server and the Studio plugin communicate with one another to synchronize the project.
The basic architecture looks like this:
VS Code
   │
   │ local files
   ▼
Rojo project
   │
   │ rojo serve
   ▼
Rojo server
   │
   │ local connection
   ▼
Roblox Studio
   │
   ▼
Rojo Studio plugin
The plugin is therefore an essential part of live synchronization. Installing only the command-line tool is not enough if you want to connect the project directly to Studio.
Step 5: Create a Rojo Project
Rojo can initialize a project structure for you. The resulting project contains a .project.json file.
A simplified project might look like:
SpaceAdventure/
├── default.project.json
└── src/
The .project.json file tells Rojo how the local project should correspond to Roblox’s DataModel. Rojo project files contain a project name and a tree describing instances, with optional properties and file-system paths.
A simplified example is:
{
  "name": "SpaceAdventure",
  "tree": {
    "$className": "DataModel",

    "ReplicatedStorage": {
      "$className": "ReplicatedStorage",
      "$path": "src/ReplicatedStorage"
    },

    "ServerScriptService": {
      "$className": "ServerScriptService",
      "$path": "src/ServerScriptService"
    },

    "StarterPlayer": {
      "$className": "StarterPlayer",

      "StarterPlayerScripts": {
        "$className": "StarterPlayerScripts",
        "$path": "src/StarterPlayer/StarterPlayerScripts"
      }
    }
  }
}
This tells Rojo where the local folders belong inside the Roblox DataModel.
Step 6: Understand the src Directory
A common organization is to put source files inside a src directory.
For example:
src/
├── ReplicatedStorage/
├── ServerScriptService/
├── ServerStorage/
├── StarterGui/
├── StarterPlayer/
└── Workspace/
The exact project structure depends on your game.
A larger project might look like:
src/
├── ReplicatedStorage/
│   ├── Shared/
│   ├── Remotes/
│   └── Packages/
│
├── ServerScriptService/
│   ├── Services/
│   ├── Systems/
│   └── Main.server.lua
│
├── ServerStorage/
│   ├── Assets/
│   └── ServerModules/
│
├── StarterPlayer/
│   ├── StarterPlayerScripts/
│   └── StarterCharacterScripts/
│
└── StarterGui/
This approach separates shared code, server code, client code, and server-only resources.
Step 7: Understand Luau File Naming
Rojo uses file naming conventions to determine the Roblox script type.
A file such as:
InventoryService.server.lua
represents a server Script.
A file such as:
InventoryController.client.lua
represents a client LocalScript.
A file such as:
Inventory.lua
normally represents a ModuleScript.
This mapping is fundamental to a Rojo workflow.
For example:
ServerScriptService/
└── Services/
    └── InventoryService.server.lua
becomes conceptually:
ServerScriptService
└── Services
    └── InventoryService
with the appropriate Script instance.
Similarly:
ReplicatedStorage/
└── Shared/
    └── MathUtils.lua
becomes a ModuleScript that can be required by appropriate scripts.
Step 8: Write Your First Luau Module
Create:
src/ReplicatedStorage/Shared/MathUtils.lua
Add:
--!strict

local MathUtils = {}

function MathUtils.add(a: number, b: number): number
	return a + b
end

return MathUtils
The --!strict directive enables strict type checking for that file. Luau supports several type-checking modes, and strict mode can catch mismatched values earlier in development.
The module can then be required from another script:
local ReplicatedStorage = game:GetService("ReplicatedStorage")

local MathUtils = require(
	ReplicatedStorage.Shared.MathUtils
)

print(MathUtils.add(5, 10))
The advantage is that the module exists as an ordinary local source file while Rojo makes it available as a ModuleScript inside Studio.
Step 9: Create a Server Script
Create:
src/ServerScriptService/Main.server.lua
Add:
--!strict

local ReplicatedStorage = game:GetService("ReplicatedStorage")

local MathUtils = require(
	ReplicatedStorage.Shared.MathUtils
)

print("Server started")
print(MathUtils.add(20, 30))
When synchronized, this becomes a server-side Script under ServerScriptService.
This separation is important because Roblox distinguishes server and client execution environments. Your local file structure should preserve that distinction rather than treating every Luau file as interchangeable.
Step 10: Start the Rojo Server
Once your project exists, start live synchronization.
From the project directory, run:
rojo serve
Rojo starts a local server, commonly using its configured port. The server then waits for the Studio plugin to connect. The official workflow describes starting the live-sync server and then connecting the Studio plugin to it.
You may see information similar to:
Rojo server listening:
Address: localhost
Port: 34872
The exact port can be configured in the project file or overridden from the command line.
Step 11: Connect Roblox Studio
Open Roblox Studio and load the place you want to use for development.
Open the Rojo plugin and choose the connection option.
If the server is running correctly, Studio should connect to the local Rojo server.
The basic process is:
1. Open project in VS Code
2. Start Rojo
3. Open Roblox Studio
4. Open Rojo plugin
5. Connect
6. Edit files in VS Code
7. Watch changes appear in Studio
Once connected, editing a Luau file locally should cause the corresponding script in Studio to update.
What Happens When You Save a Luau File?
Suppose you change:
print("Hello")
to:
print("Hello from VS Code")
and save the file.
The workflow is approximately:
VS Code
   ↓
File saved
   ↓
Rojo detects change
   ↓
Rojo maps file to Roblox instance
   ↓
Studio receives update
   ↓
Script changes in Explorer
This eliminates the need to repeatedly copy and paste code between Studio and VS Code.
Rojo’s synchronization model maps files into Roblox instances according to the project definition and supported file types.
Building a Place File
Live synchronization is ideal for development, but Rojo can also build project files.
For example:
rojo build -o build.rbxlx
This generates a place file from the Rojo project. Rojo documentation describes building a project into .rbxlx as a useful way to generate a complete place representation.
This can be useful for:
- automated builds
- backups
- testing
- CI workflows
- distributing project builds
- creating reproducible development environments
The key distinction is:
rojo serve
    ↓
Live development synchronization

rojo build
    ↓
Generate a place/model file
How to Organize a Professional Rojo Project
A scalable structure might look like:
MyGame/
├── default.project.json
├── src/
│   ├── ReplicatedStorage/
│   │   ├── Shared/
│   │   ├── Remotes/
│   │   └── Packages/
│   │
│   ├── ServerScriptService/
│   │   ├── Services/
│   │   ├── Systems/
│   │   └── Main.server.lua
│   │
│   ├── ServerStorage/
│   │   └── Assets/
│   │
│   ├── StarterPlayer/
│   │   ├── StarterPlayerScripts/
│   │   └── StarterCharacterScripts/
│   │
│   └── StarterGui/
│
└── README.md
The exact architecture should reflect the game rather than being copied blindly. The objective is to create clear boundaries between code that runs on the server, code that runs on clients, and code intended to be shared.
Using Luau Type Checking With Rojo
One of the biggest advantages of local development is integrating Luau tooling into the editing process.
For example:
--!strict

type PlayerData = {
	Coins: number,
	Level: number,
}

local function addCoins(data: PlayerData, amount: number)
	data.Coins += amount
end
If you accidentally pass an incompatible value, the type checker can provide feedback during development.
Luau’s type system supports annotations and inference and can provide errors and warnings before the program executes.
This becomes especially valuable when your project contains:
- services
- controllers
- modules
- data structures
- networking
- inventory systems
- combat systems
- UI controllers
Using a Language Server in VS Code
A language server can provide features such as:
- autocomplete
- type checking
- go-to-definition
- symbol navigation
- code diagnostics
The external-editor workflow is considerably stronger when the editor understands Roblox’s DataModel hierarchy and Luau syntax. Current Roblox documentation recommends using a Luau language-server workflow when developing scripts externally.
This means VS Code becomes more than a basic text editor. It becomes a development environment capable of understanding many of the relationships in your Roblox code.
Working With RemoteEvents
Rojo does not change how RemoteEvents work. It only changes how you organize and synchronize the source code that creates and handles them.
For example:
src/
└── ReplicatedStorage/
    └── Remotes/
        └── FireWeapon.remote.json
Depending on your project architecture, you can also define the RemoteEvent through project configuration or create supported instances through your Rojo hierarchy.
Your server-side code should still treat clients as untrusted. A LocalScript can request an action, but authoritative game logic should remain server-side.
For example, the client might request:
FireWeapon:FireServer("Pistol", targetPosition)
while the server determines:
- whether the player owns the weapon
- whether the weapon is equipped
- whether the player has ammunition
- whether the cooldown has elapsed
- whether the target is valid
- how much damage should be applied
Rojo is a project-management tool; it does not make client-server communication secure automatically.
What Rojo Does Not Synchronize Perfectly
Rojo supports many Roblox properties and instance types, but real-time synchronization does not cover every possible Roblox property equally. Some properties have limitations because of Studio’s plugin interfaces. Examples include certain binary data, terrain or CSG-related information, and some properties such as specific mesh or HTTP settings.
This means you should not assume that every Studio object can be represented perfectly as plain source files.
A practical workflow is therefore often hybrid:
Code
   ↓
Rojo

Project structure
   ↓
Rojo

Supported configuration
   ↓
Rojo

Complex binary assets
   ↓
Studio / asset pipeline
Understanding this limitation prevents confusion when something appears to work differently from a Luau script.
Common Rojo Problems
Rojo Command Not Found
If the terminal says that rojo is not recognized, the CLI may not be installed or may not be available through your PATH.
Installing the VS Code extension alone does not necessarily place the CLI command in your system PATH.
Studio Cannot Connect
Check:
- Rojo server is running.
- The correct project is open.
- The Studio plugin is installed.
- The plugin is attempting to connect to the correct local server.
- Your local security software is not interfering with the connection.
- The project configuration is valid.
Rojo’s default serving port is configurable, so confirm that the server and plugin are using the intended connection details.
File Appears in the Wrong Location
Check default.project.json.
A path such as:
"ServerScriptService": {
	"$className": "ServerScriptService",
	"$path": "src/ServerScriptService"
}
means that the local directory is mapped into that Roblox service.
If your project tree does not match your intended Roblox hierarchy, inspect the project file before changing individual scripts.
Script Has the Wrong Type
Check the filename.
Test.server.lua
is intended as a server script.
Test.client.lua
is intended as a client script.
Test.lua
is generally a ModuleScript.
Rojo uses these conventions when translating files into script instances.
Working With Existing Roblox Games
Moving an existing game into a Rojo workflow requires more planning than starting a new project.
Do not immediately attempt to represent every object in the place as files.
First identify:
Server code
Client code
Shared modules
Remotes
Important folders
Assets
UI
Terrain
Complex models
Configuration
Then gradually move suitable components into the local project.
A staged migration is safer because it lets you test each section before moving more of the project.
Source Control
Once your Roblox source exists as normal files, it can be placed under source control.
A typical project might contain:
default.project.json
src/
README.md
.gitignore
Avoid committing secrets, account credentials, security cookies, local machine data, generated build files that do not belong in the repository, or other sensitive information.
Source control becomes particularly useful for:
- tracking changes
- reverting mistakes
- reviewing code
- collaborating
- creating branches
- testing features independently
- preserving previous versions
Rojo’s file-system-first approach is specifically useful when you want the project represented on disk and managed through normal development tooling.
A Recommended Daily Workflow
A simple daily workflow can be:
1. Open VS Code.
2. Open the Roblox project folder.
3. Check the current source-control state.
4. Start Rojo.
5. Open Roblox Studio.
6. Connect the Rojo plugin.
7. Make code changes in VS Code.
8. Save files.
9. Test in Studio.
10. Fix errors.
11. Run broader tests.
12. Review changes.
13. Commit stable work.
The important habit is to make local files the primary source for code rather than randomly editing the same script in both environments.
Best Practices
Keep server code separate
Do not mix server-only and client-only logic unnecessarily.
Use modules
Break large scripts into focused modules.
Enable strict typing
Use --!strict where appropriate.
Keep project configuration readable
Your .project.json file becomes an important part of the project architecture.
Use meaningful names
Names such as:
InventoryService.server.lua
CombatService.server.lua
PlayerData.lua
InventoryController.client.lua
are easier to understand than:
Script1.lua
Script2.lua
Main.lua
Test.lua
Test synchronization regularly
Do not wait until the project is large before checking that your Rojo mapping still behaves correctly.
Do not assume every Studio object belongs in source files
Some assets and properties are better handled through other workflows.
Frequently Asked Questions
Is Rojo required to use VS Code for Roblox?
No. Roblox Studio has its own Script Sync feature that can synchronize scripts with local files. Rojo is useful when you want a broader file-system-first project workflow.
Can I edit Luau in VS Code and see the changes in Studio immediately?
Yes. With the Rojo server running and the Studio plugin connected, local file changes can be synchronized into Studio.
Does Rojo replace Roblox Studio?
No. Studio remains useful for testing, play mode, inspecting the DataModel, debugging, building, and many Roblox-specific workflows.
Does Rojo save my game automatically to Roblox?
Rojo’s live synchronization is not the same thing as publishing your experience. You still need an appropriate publishing workflow.
What file extension should I use for ModuleScripts?
A normal .lua file is commonly represented as a ModuleScript in Rojo’s file mapping system.
What file extension should I use for server scripts?
Use the server-script naming convention, such as:
Main.server.lua
Rojo maps .server.lua files to server Script instances.
What file extension should I use for client scripts?
Use:
Main.client.lua
Rojo maps .client.lua files to client LocalScript instances.
Can Rojo synchronize models?
Rojo supports supported Roblox model formats, including .rbxm and .rbxmx, although synchronization capabilities vary by property and asset type.
Can Rojo synchronize Terrain?
Some binary and complex data has limitations in real-time synchronization. Terrain is specifically among the areas where developers may need a different workflow.
Is Rojo good for large Roblox projects?
Rojo is designed around file-system-based project management and can be combined with source control and development tooling, making it suitable for structured code-heavy projects.
Should I edit the same script in VS Code and Studio?
It is better to establish a clear source of truth. If your project uses Rojo, treat the local source files as the primary place for code changes.
Can I use Rojo with Luau type checking?
Yes. Rojo manages project synchronization, while Luau’s type system provides type checking for your source code. These tools solve different parts of the development workflow.
Does Rojo work on Windows, macOS, and Linux?
Rojo provides supported installation options and prebuilt binaries for major desktop operating systems.
Final Thoughts
The combination of VS Code, Rojo, Roblox Studio, and Luau creates a development workflow that separates source-code management from the Studio interface without eliminating Studio from the process. Your Luau files live in a normal local project, Rojo maps those files into the Roblox DataModel, and Studio provides the environment where you can run and inspect the game.
The most important concept is to understand which tool is responsible for which job. VS Code is your development environment, Luau is your programming language, Rojo maps the local project into Roblox, and Studio remains the primary environment for running and interacting with the Roblox experience.
Once this separation becomes familiar, large Roblox projects become easier to organize, review, test, and maintain.