
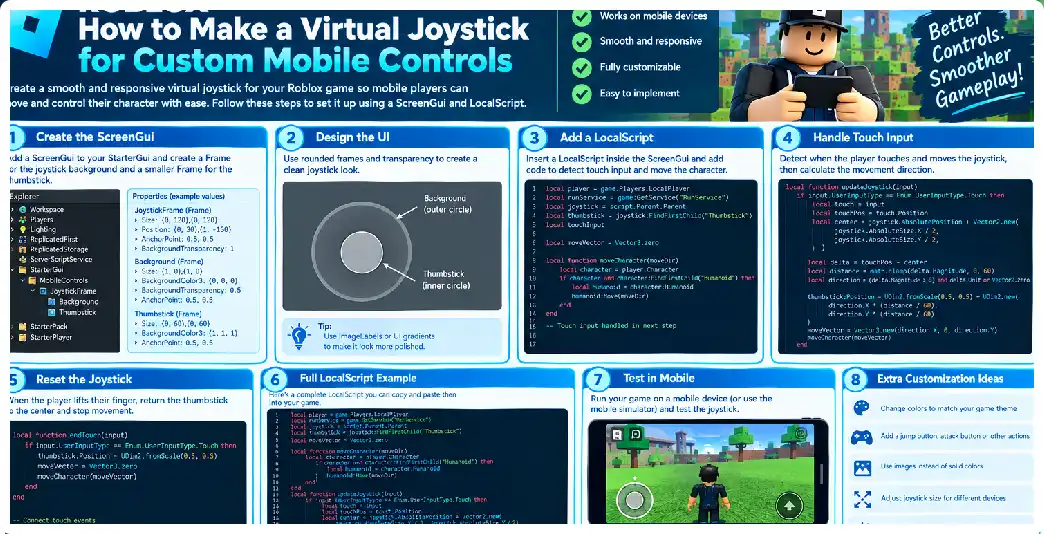
A virtual joystick is one of the most useful custom mobile controls you can build for a Roblox experience. Instead of requiring mobile players to use the default movement interface, a developer can create a custom on-screen joystick that matches the game’s visual style, occupies a carefully selected area of the screen, and converts touch movement into character movement. A good virtual joystick needs to handle touch input, calculate direction and magnitude, limit the thumb movement to a defined radius, return smoothly to its center when the player releases the screen, and communicate the resulting movement to the character controller. Roblox provides client-side input APIs, GUI touch events, and Humanoid movement APIs that can be combined to build this system.
The most important thing to understand is that a virtual joystick is not actually a physical joystick. It is a graphical interface that interprets the position of a player’s finger relative to a joystick center. If the finger moves directly upward, the joystick produces a forward vector. If the finger moves down and to the right, it produces a diagonal vector. If the finger reaches the edge of the joystick’s allowed movement area, the output should be clamped so that the resulting vector does not exceed its maximum magnitude. This normalized vector can then be converted into a Vector3 and passed to the character movement system.
What You Are Building
A basic custom joystick can contain two visual objects:
ScreenGui
└── Joystick
    ├── Base
    └── Thumb
The Base is the circular area representing the joystick’s movement boundary. The Thumb is the smaller circular control that follows the player’s finger. The base normally remains fixed while the thumb moves inside it. GUI objects expose properties such as position, size, anchor point, and absolute screen coordinates, which are useful when calculating the relationship between the finger position and the joystick center.
The overall input flow is:
Player touches joystick
        ↓
Touch begins
        ↓
Record starting position
        ↓
Finger moves
        ↓
Calculate offset from center
        ↓
Clamp offset to joystick radius
        ↓
Convert offset to normalized direction
        ↓
Convert direction to 3D movement
        ↓
Move Humanoid
        ↓
Finger released
        ↓
Reset joystick
This approach keeps the user interface and character movement logic conceptually separate.
Why Use a Custom Joystick?
The default mobile controls may be perfectly adequate for many experiences, but a custom control becomes useful when the game’s interface has a specialized visual identity or unusual movement requirements. A custom joystick can be positioned around other interface elements, resized for a particular experience, combined with custom action buttons, or adapted for different gameplay styles. Roblox’s mobile UI guidance recommends considering thumb reach and avoiding important controls in uncomfortable areas of the screen.
For example, a racing game might use a different control arrangement from a third-person adventure game. A shooter might have a left movement joystick and a right-side aiming area. A survival game could use the left joystick for movement while placing interaction, jump, crouch, sprint, and attack controls around the right side.
The important principle is that the joystick should solve a gameplay problem rather than simply duplicate the default interface without a reason.
Step 1: Create the ScreenGui
Create a ScreenGui under StarterGui.
A basic hierarchy can be:
StarterGui
└── MobileControls
    └── MovementJoystick
        ├── Base
        └── Thumb
Because the joystick is an interface element, it should be controlled by a client-side LocalScript. Input services such as UserInputService are client-oriented, and Roblox provides touch-specific input events for client-side interaction.
Set the Base to a circular-looking image or a rounded frame. Set the Thumb to a smaller circular image or frame.
A simple visual arrangement might be:
       ┌─────────────────────────────┐
       │                             │
       │                             │
       │                             │
       │                             │
       │   ┌─────────────┐           │
       │   │      ●      │           │
       │   │    Base     │           │
       │   └─────────────┘           │
       │                             │
       └─────────────────────────────┘
The actual graphics are entirely up to the game’s design.
Step 2: Position the Joystick in the Mobile Thumb Zone
A common mistake is placing the joystick too far toward the middle of the screen. Mobile players generally operate movement controls with their thumbs, so the lower-left portion of the screen is a natural area for a movement control. However, the exact placement should be tested across phones and tablets because physical reach differs with screen size and how players hold their devices.
You can position the joystick using a combination of scale and offset.
For example:
Joystick.Position = UDim2.new(
    0,
    40,
    1,
    -180
)
The exact numbers should be adjusted according to your interface.
Avoid placing important information directly underneath the joystick. If the joystick covers health, inventory, quest information, or other essential UI, players may have difficulty interacting with the interface.
Step 3: Give the Joystick a Fixed Movement Radius
The joystick should not allow the thumb to travel indefinitely.
Suppose:
local radius = 70
The player’s finger could theoretically move hundreds of pixels away from the center, but the thumb should stop at 70 pixels from the center.
Mathematically:
offset = fingerPosition - centerPosition
distance = magnitude(offset)
If:
distance <= radius
use the original offset.
If:
distance > radius
scale it back to the radius.
This creates a circular constraint.
Step 4: Understand the Vector Calculation
Suppose the center of the joystick is:
(100, 500)
and the player’s finger is:
(130, 470)
The offset is:
(30, -30)
The negative Y value means the finger moved upward on the screen.
The distance from the center is:
sqrt(30² + (-30)²)
which is approximately:
42.4 pixels
If the maximum radius is 70 pixels, the finger is still inside the joystick.
To turn this into movement, divide by the maximum radius:
X = 30 / 70
Y = -30 / 70
producing approximately:
(0.43, -0.43)
This becomes a normalized movement vector representing both direction and approximate intensity.
Step 5: Create the LocalScript
Place a LocalScript inside the joystick.
A basic implementation can use InputBegan, InputChanged, and InputEnded. GUI objects provide these events and expose the relevant input object’s type, state, and screen position.
A starting structure is:
local Players = game:GetService("Players")
local UserInputService = game:GetService("UserInputService")

local player = Players.LocalPlayer

local joystick = script.Parent
local base = joystick:WaitForChild("Base")
local thumb = base:WaitForChild("Thumb")

local radius = 60

local activeTouch = nil
local inputPosition = Vector2.zero
The script needs to remember which touch is controlling the joystick. This becomes especially important when the player uses multiple fingers.
Step 6: Detect the Initial Touch
When the player places a finger on the joystick, identify the touch input.
base.InputBegan:Connect(function(input)
    if input.UserInputType == Enum.UserInputType.Touch then
        if activeTouch == nil then
            activeTouch = input
        end
    end
end)
Touch input objects identify the interaction as a touch input, and GUI input events can be filtered by UserInputType.
Do not allow another finger to replace the active joystick touch while the joystick is already being controlled. Otherwise, a player could accidentally move the character when interacting with another control.
Step 7: Track Finger Movement
The finger position can be obtained from the input object.
The joystick’s center can be calculated from its absolute position and size.
local function getCenter()
    return base.AbsolutePosition + base.AbsoluteSize / 2
end
Then calculate:
local function calculateOffset(position)
    return position - getCenter()
end
This gives a Vector2.
Step 8: Clamp the Thumb
The core joystick calculation can look like:
local function updateJoystick(position)
    local center = getCenter()

    local offset = position - center
    local distance = offset.Magnitude

    if distance > radius then
        offset = offset.Unit * radius
    end

    return offset
end
The Unit vector represents direction without the original magnitude. Multiplying it by radius places the point exactly on the joystick’s outer boundary.
This is the mathematical heart of the virtual joystick.
Step 9: Move the Thumb
After calculating the offset, change the thumb’s position.
thumb.Position = UDim2.fromOffset(
    base.AbsoluteSize.X / 2 + offset.X,
    base.AbsoluteSize.Y / 2 + offset.Y
)
If your thumb uses a centered AnchorPoint, the exact calculation will be slightly different. Centering the anchor point can simplify the positioning because the thumb’s position represents its center rather than one corner.
For example:
thumb.AnchorPoint = Vector2.new(0.5, 0.5)
GUI AnchorPoint determines the origin from which the object’s position is interpreted, making it useful for centering circular controls.
Step 10: Convert the Joystick Into Movement
Once you have an offset, divide it by the radius.
local direction2D = offset / radius
This gives a value approximately between:
-1 and +1
on each axis.
Convert it to a 3D direction:
local moveDirection = Vector3.new(
    direction2D.X,
    0,
    direction2D.Y
)
The Y component of the Vector3 is zero because the player is moving across the ground rather than vertically.
Step 11: Use Humanoid:Move
Roblox provides Humanoid:Move() for supplying a movement direction to a character. The method accepts a Vector3 direction and a relativeToCamera parameter.
For camera-relative movement:
humanoid:Move(moveDirection, true)
The second argument being true means the movement direction is interpreted relative to the camera.
This can produce the familiar third-person control behavior where pushing the joystick upward causes the character to move toward the direction the camera considers forward.
Step 12: Update Movement Continuously
The joystick needs to continue applying movement while the player holds the finger.
One approach is to store the current movement vector and apply it during a render or input update.
Roblox’s RunService provides client-side frame events and BindToRenderStep(). The documentation also cautions that render-step callbacks should remain lightweight because rendering waits for them to finish.
For example:
local RunService = game:GetService("RunService")

local currentDirection = Vector3.zero

RunService:BindToRenderStep(
    "CustomJoystickMovement",
    Enum.RenderPriority.Character.Value + 1,
    function()
        local character = player.Character
        if not character then
            return
        end

        local humanoid = character:FindFirstChildOfClass("Humanoid")
        if not humanoid then
            return
        end

        humanoid:Move(currentDirection, true)
    end
)
The render callback should contain as little work as possible. Avoid expensive calculations, unnecessary object creation, or repeated searches through large hierarchies inside it.
Step 13: Stop Movement When the Finger Leaves
When the active touch ends:
UserInputService.TouchEnded:Connect(function(input)
    if input == activeTouch then
        activeTouch = nil
        currentDirection = Vector3.zero

        thumb.Position = UDim2.fromScale(0.5, 0.5)
    end
end)
UserInputService exposes touch-ended events that can be used to detect when a touch interaction finishes.
The joystick should always return to its neutral position.
Step 14: Use Dead Zones
A small dead zone can make the joystick feel more stable.
Without a dead zone, tiny finger movements can produce tiny character movements.
For example:
local DEAD_ZONE = 0.12

if direction2D.Magnitude < DEAD_ZONE then
    direction2D = Vector2.zero
end
The dead zone should not be too large because that makes the joystick feel unresponsive.
A reasonable workflow is to start small, test on real devices, and adjust based on actual player interaction.
Step 15: Add a Response Curve
A linear joystick means:
50% finger displacement
=
50% movement magnitude
That is simple, but not necessarily ideal.
You can use a response curve:
local magnitude = direction2D.Magnitude
local adjustedMagnitude = magnitude ^ 1.5
Then:
direction2D = direction2D.Unit * adjustedMagnitude
This can provide more precise control near the center while still reaching full movement at the edge.
The exact curve depends on the game. A competitive movement game may benefit from predictable linear behavior, while a casual game may feel better with a softer curve.
Step 16: Dynamic Joystick Versus Fixed Joystick
There are two major joystick styles.
Fixed joystick
The base remains in one location.
┌───────────────────────┐
│                       │
│  ( joystick )         │
│                       │
└───────────────────────┘
This is easy to learn because players know exactly where movement begins.
Dynamic joystick
The joystick appears or moves to the location where the player touches a designated movement zone.
Player touches
      ↓
Joystick appears
      ↓
Finger movement controls it
Dynamic controls can provide flexibility, but they require more careful handling because the initial touch becomes the joystick center.
Step 17: Dynamic Joystick Logic
For a dynamic joystick:
local startPosition = input.Position
Then place the base at that position.
The finger’s subsequent movement is calculated relative to that starting point.
This is conceptually:
Touch start
   ↓
Center = touch position
   ↓
Touch moves
   ↓
Offset = current - center
The same clamping mathematics can then be used.
Step 18: Handling Multiple Fingers
Mobile players often use more than one finger. For example:
Left thumb  → movement
Right thumb → camera
Right finger → jump
Your movement joystick should track one specific InputObject.
Do not simply process every touch event.
Use:
if input == activeTouch then
    -- Process this touch
end
This prevents another finger from accidentally taking over the joystick.
Roblox’s touch APIs provide information about touch inputs, and GUI input events can distinguish individual input objects.
Step 19: Prevent UI Conflicts
The joystick occupies screen space and may overlap other interface elements. GUI objects have input-related properties and events that determine how they interact with other input targets.
For example, you do not want a movement touch to simultaneously activate:
Inventory
Attack
Jump
Shop
Dialogue
unless that behavior is intentionally designed.
Organize the GUI layers and interaction zones carefully.
Step 20: Detect Touch Devices
You may want the custom joystick to appear only on touch-enabled devices.
UserInputService exposes TouchEnabled, allowing client code to determine whether touch input is available. It also provides PreferredInput, which can help determine the player’s preferred input method.
Conceptually:
if UserInputService.TouchEnabled then
    joystick.Visible = true
else
    joystick.Visible = false
end
This prevents a mobile-only joystick from unnecessarily appearing for keyboard-and-mouse players.
Step 21: Consider Preferred Input
A device can potentially have multiple input methods. PreferredInput provides information about the input method currently preferred by the player, including touch, gamepad, and keyboard/mouse.
This can help create adaptive controls.
For example:
Touch
→ Show mobile controls

Keyboard/mouse
→ Hide mobile controls

Gamepad
→ Show controller prompts
This is better than assuming that a device will always use one input method.
Step 22: Mobile Screen Size
A joystick that looks perfect on one phone may be too small on another device.
Roblox’s UI guidance specifically discusses screen size, reserved areas, and comfortable thumb zones. It also provides viewport information that can be used to adapt interfaces to different display sizes.
You can create different size profiles:
Small display
→ smaller joystick

Medium display
→ normal joystick

Large display
→ larger joystick
Do not simply scale everything proportionally without testing. A larger tablet does not necessarily mean the player wants an enormous joystick.
Step 23: Add Visual Feedback
The joystick should communicate its state.
When pressed:
Base transparency ↓
Thumb brightness ↑
When released:
Base returns to normal
Thumb returns to center
You can also slightly scale the thumb while active.
Visual feedback helps players understand whether their touch was recognized.
Step 24: Add Smooth Return
Instead of immediately moving the thumb to the center, you can animate it.
However, the input state should be reset immediately even if the visual animation takes a fraction of a second.
For example:
Touch ends
   ↓
Movement = zero immediately
   ↓
Thumb visually returns
This prevents the character from continuing to move during the return animation.
Step 25: Custom Sprint
A virtual joystick can be extended with a sprint button.
The interface could become:
┌───────────────┐
│               │
│  Joystick     │       Sprint
│               │
└───────────────┘
The joystick should continue to represent movement direction while the sprint button represents a separate action.
This is where action-oriented input architecture becomes useful. ContextActionService can bind actions to multiple input types and can create touch buttons, although its automatically generated touch buttons have less visual customization than a completely custom GUI.
When to Use ContextActionService
ContextActionService is useful for actions such as:
Jump
Sprint
Interact
Reload
Attack
It is less convenient for a highly customized analog joystick because the joystick needs continuous positional information rather than a simple button action.
The official API itself notes that its automatically created touch buttons have limited customization and that custom ImageButton or TextButton interfaces are often preferable when more visual control is needed.
Performance Considerations
A joystick is continuously updating while the player touches the screen. Keep the calculation lightweight.
Avoid:
while true do
    -- expensive calculations
end
Instead, respond to input events and maintain a small movement state.
If a frame-by-frame update is required, keep it minimal. Roblox’s performance guidance recommends avoiding unnecessary render-step callbacks and ensuring that functions bound to the render loop do very little work.
Recommended Folder Structure
A clean project could look like:
StarterGui
└── MobileControls
    ├── MovementJoystick
    │   ├── Base
    │   │   └── Thumb
    │   └── JoystickController
    │
    ├── JumpButton
    ├── SprintButton
    └── AttackButton
For a larger project:
StarterPlayer
└── StarterPlayerScripts
    └── MobileController
can contain a central controller that coordinates all mobile input.
Complete Beginner Architecture
The final system should look like:
Touch Input
    ↓
Joystick GUI
    ↓
Touch Position
    ↓
Offset Calculation
    ↓
Radius Clamp
    ↓
Dead Zone
    ↓
Response Curve
    ↓
Movement Vector
    ↓
Humanoid:Move()
The joystick itself remains client-side because it represents local input and UI. The character’s resulting movement is then processed by Roblox’s character systems. The Humanoid:Move() API directly accepts the movement vector used in this approach.
Testing the Joystick
Test at least these situations:
- Touch directly in the center.
- Move upward.
- Move downward.
- Move left.
- Move right.
- Move diagonally.
- Drag beyond the joystick radius.
- Release the finger.
- Quickly touch and release.
- Use two fingers.
- Open another UI menu.
- Rotate the device if supported by your target setup.
- Test different screen sizes.
- Test low frame rates.
- Test character respawning.
The joystick should always return to a known state after a character respawn or UI reset.
Testing Different Devices
Do not rely exclusively on the Studio emulator. Real devices can have different screen dimensions, touch behavior, aspect ratios, and physical thumb reach.
The interface should be tested on both phones and tablets because comfortable thumb zones can differ substantially.
Common Mistakes
Making the joystick too small
A tiny joystick is difficult to control accurately.
Making the joystick too large
A huge joystick consumes valuable screen space.
Not clamping the thumb
Without clamping, the thumb can move far outside the base.
Using every touch as movement
This breaks when players use multiple fingers.
Forgetting to stop movement
The player may continue moving after releasing the screen.
Updating too much every frame
This can create unnecessary performance overhead.
Ignoring mobile thumb zones
Important controls should remain comfortable to reach.
Mixing UI and gameplay logic
Keep joystick calculations separate from unrelated systems.
Frequently Asked Questions
Can I completely replace the default mobile joystick?
Yes, but you should deliberately manage the game’s mobile control experience rather than leaving overlapping controls active. The interface system provides mechanisms for touch controls, and the touch-control display can be enabled or disabled through the appropriate client-side UI services.
Should the joystick be a Frame or ImageButton?
Either can work. A custom GUI often uses frames and images for visual elements and GUI input events for touch detection. ImageButton can be useful when you want button-oriented interaction and visual behavior.
Can I make the joystick transparent?
Yes. The visual appearance is independent of the movement calculation.
Can I make the joystick move dynamically?
Yes. Record the initial touch position as the joystick center and calculate subsequent movement relative to that position.
How do I prevent diagonal movement from being too fast?
Clamp the vector by magnitude and normalize it before applying movement.
Why does my character keep moving after I release?
Your script is probably not clearing the active touch and movement vector when the input ends.
Can I use the joystick for vehicles?
Yes. Instead of passing the resulting vector to Humanoid:Move(), send the directional information to the vehicle controller.
Can the joystick control camera movement?
Yes, although camera control normally benefits from a separate touch region or right-side virtual control.
Should I use UserInputService or GuiObject input events?
Both are valid. GUI events are convenient when the joystick itself owns the input region, while UserInputService provides broader touch-input access.
Can I support PC and mobile with the same system?
Yes. Detect the active input method and show or hide the appropriate controls. PreferredInput can help identify the currently preferred input category.
Is a custom joystick expensive for performance?
A simple joystick is lightweight when implemented efficiently. Avoid unnecessary work in frame-by-frame callbacks and keep input calculations small.
Does this work for players in the USA, UK, and Canada?
Yes. The underlying input APIs and control architecture are not country-specific. You should nevertheless test your interface across different devices and provide clear, accessible controls.